
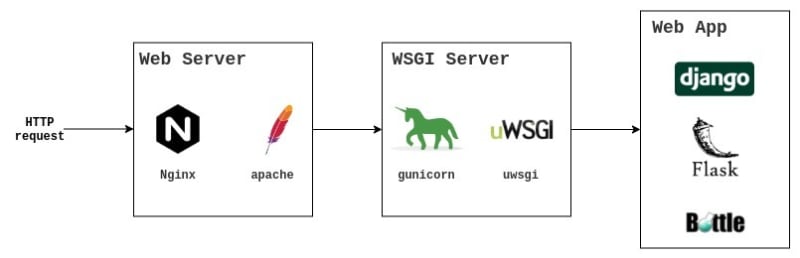
Deploying a Flask API is a common task for developers aiming to bring their web applications to life. While Flask itself is a powerful micro web framework, deploying it efficiently requires a reliable and scalable setup. This article will guide you through the process of deploying a Flask API using Gunicorn and Apache2. By leveraging Gunicorn, a Python WSGI HTTP Server for UNIX, and the robust Apache2 web server, you can ensure your Flask API performs well under heavy loads and remains secure. Let’s dive into the steps to get your Flask application up and running in a production environment.
Installation
Firstly please install your application somewhere in your server, for good practice it is recommanded to user this following path /var/www/html/you_project
In this folder, check if you have a .venv folder which is the virtual environment to run python locally. If you do not have this environment, please create it by executing this command : python3 -m venv .venv. Then access to this virtual environment with source .venv/bin/avtivate then do not forget to pip install all your packages in your projects.
Make sure to install these packages :
gunicornFlask
Once done, please execute the command to deploy the flask API with gunicorn gunicorn -b 0.0.0.0:5000 main:app. It should return you something like that :
(.venv) ubuntu@ip-10-0-3-23:~/_Projets/API_Hub/API-Webhook gunicorn -b 0.0.0.0:5002 main:app
[2024-05-22 11:44:31 +0200] [7898] [INFO] Starting gunicorn 21.2.0
[2024-05-22 11:44:31 +0200] [7898] [INFO] Listening at: http://0.0.0.0:5002 (7898)
[2024-05-22 11:44:31 +0200] [7898] [INFO] Using worker: sync
[2024-05-22 11:44:31 +0200] [7901] [INFO] Booting worker with pid: 7901
[2024-05-22 11:44:45 +0200] [7898] [INFO] Handling signal: int
[2024-05-22 11:44:45 +0200] [7901] [INFO] Worker exiting (pid: 7901)
[2024-05-22 11:44:45 +0200] [7898] [INFO] Shutting down: Master
-b 0.0.0.0:500 specify that the application will run on 0.0.0.0 on the port 5000. Of course, you can change 5000 to another port.
main:app implies that you will run your files main.py from the gunicorn files app.wsgi.
To see what app.wsgi should look like, see below
#app.wsgi
import sys
sys.path.insert(0,'/home/ubuntu/_Projets/API_Hub/API-Webhook/') # Load your project

from main import app as application # Execute your Flask app named "app"
If it’s working, then you are ready to deploy your application.
Creation of a service
First of all, we will make sure that our flask API will work at anytime in the background (so without blocking our server by being use on the main thread).
For that we will create a new service
# webhooks-apihub.service
[Unit]
Description=Gunicorn instance to serve flask API
After=network.target

[Service]
User=ubuntu
Group=ubuntu
WorkingDirectory=/home/ubuntu/_Projets/API_Hub/API-Webhook/
ExecStart=/home/ubuntu/_Projets/API_Hub/API-Webhook/.venv/bin/gunicorn -b 0.0.0.0:5000 main:app
Restart=always

[Install]
WantedBy=multi-user.target
In this command, we can see that we execute the gunicorn package in our virtual environment previously created with /home/ubuntu/_Projets/API_Hub/API-WebhookEfento/.venv/bin/gunicorn gunicorn
Once everything is done, we will enable this service and start it
# Reload all units
sudo systemctl daemon-reload
# Activate the service
sudo systemctl enable webhooks-apihub.service
# Start the service
sudo systemctl start webhooks-apihub.service
# Check the status
sudo systemctl status webhooks-apihub.service
Apache
Now, that our application is deployed, we will manage it to be accessible from the outside with Apache2.
For that, create a new .conf in /etc/apache2/sites-available/.
<VirtualHost *:80>
    ServerName www.domain.com
    ServerAdmin you@mail.com
    DocumentRoot /home/ubuntu/_Projets/API_Hub/API-Webhook/

    ErrorLog ${APACHE_LOG_DIR}/apihub-api.log
    CustomLog ${APACHE_LOG_DIR}/apihub.log combined

    ProxyPass               / http://0.0.0.0:5000/
    ProxyPassReverse        / http://0.0.0.0:5000/
    ProxyRequests           Off

    <Directory /home/ubuntu/_Projets/API_Hub/API-Webhook>
        WSGIProcessGroup app
        WSGIApplicationGroup %{GLOBAL}
        Order deny,allow
        Require all granted
    </Directory>
</VirtualHost>
This will create an HTTP link (http://www.domain.com), if you want to create an HTTPS link, make sure to use <VirtualHost *:443> which is the port used for secure HTTP connections and add your certificate and keys like that or use certbot
<VirtualHost *:443>
        ServerName www.domain.com
        ServerAdmin you@mail.com
        DocumentRoot /home/ubuntu/_Projets/API_Hub/API-Webhook/

        ErrorLog ${APACHE_LOG_DIR}/apihub-api.log
        CustomLog ${APACHE_LOG_DIR}/apihub.log combined

        ProxyPass               / http://0.0.0.0:5000/
        ProxyPassReverse        / http://0.0.0.0:5000/
        ProxyRequests           Off

        SSLEngine On
        SSLCertificateFile your/path/fullchain.crt
        SSLCertificateKeyFile /your/path/privkey.pem
        Include /etc/letsencrypt/options-ssl-apache.conf
</VirtualHost>
Once done, like our service, we will enable our site and then activate it.
# Check the syntaxe of each conf file
sudo apachectl -t
# Enable the conf
sudo a2ensite webhooks-apihub.service.conf
# Restart apache2 to take in consideration changes without stopping the service
sudo systemctl reload apache2
# Check the status
sudo systemctl reload apache2
Now, if the status is correct, you should see something on www.domain.com… then congratulation, you succeed to deploy your first application flask ! On the future, if you want to add new flask API, make sure to user another port gunicorn than 5000.
Laisser un commentaire